The Pyccel Compiler
Typical processing using Pyccel can be splitted into 3 main stages:
- First, we parse the Python file or text, and we create an intermediate representation (IR) that consists of objects described in pyccel.parser.syntax
- Most of all these objects, when it makes sens, implement the property expr. This allows to convert the object to one or more objects from pyccel.ast.core. All these objects are extension of the sympy.core.Basic class. At the end of this stage, the IR will be converted into the Abstract Syntax Tree (AST).
- Using the Codegen classes or the user-friendly functions like fcode, the AST is converted into the target language (for example, Fortran)
Note
Always remember that Pyccel core is based on sympy. This can open a very wide range of applications and opportunities, like automatically evaluate the computational complexity of your code.
Note
There is an intermediate step between 2 and 3, where one can walk through the AST and modify the code by applying some recursive functions (ex: mpify, openmpfy, …)
Todo
add diagram
The idea behind Pyccel is to use the available tools for Python, without having to implement everything as it is usually done for every new language. The aim of using such high level language is to ensure a user-friendly framework for developping massively parallel codes, without having to work in a hostile environment such as Fortran or an obscur language like c++. Most of all, compared to other DSLs for HPC, all elements and parallel paradigms of the language are exposed.
Among the very nice tools for Python developpers, Pylint is used for static checking. This allows us to avoid writing a linter tool or having to implement an advanced tool to handle errors. Following the K.I.S.S paradigm, we want to keep it stupid and simple, hence if you are getting errors with Pylint, do not expect Pyccel to run!! We assume that you are capable of writing a valid Python code. If not, then try first to learn Python before trying to do fancy things!
Compiling a single file
TODO
Syntax analysis
Semantic analysis
Code generation
Backend compilation
Setting up a project
The root directory of a Pyccel collection of pyccel sources
is called the source directory. This directory also contains the Pyccel
configuration file conf.py, where you can configure all aspects of how
Pyccel converts your sources and builds your project.
Pyccel comes with a script called pyccel-quickstart that sets up a
source directory and creates a default conf.py with the most useful
configuration values. Just run
$ pyccel-quickstart -h
for help.
For example, runing:
$ pyccel-quickstart poisson
will create a directory poisson where you will find, inside it:
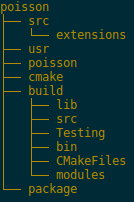
Structure of the poisson project after running pyccel-quickstart.
Defining document structure
Let’s assume you’ve run pyccel-quickstart for a project poisson. It created a source
directory with conf.py and a directory poisson that contains a master file, main.py (if you used the defaults settings). The main function of the master document is to
serve as an example of a main program.
Adding content
In Pyccel source files, you can use most features of standard Python instructions. There are also several features added by Pyccel. For example, you can use multi-threading or distributed memory programing paradigms, as part of the Pyccel language itself.
Running the build
Now that you have added some files and content, let’s make a first build of the project. A build is started with the pyccel-build program, called like this:
$ pyccel-build application
where application is the application directory you want to build.
 Refer to the pyccel-build man page <pyccel-build> for all
options that pyccel-build supports.
Refer to the pyccel-build man page <pyccel-build> for all
options that pyccel-build supports.
Notice that pyccel-quickstart script creates a build directory build directory in which you can use cmake or Makefile.
In order to compile manualy your project, you just need to go to this build directory and run
$ make
Basic configuration
Todo
add basic configurations.